

Ever launched an Amazon ad campaign only to see a small influx of orders and nothing more?
If yes, you’re not alone. We know how frustrating that feels, especially after putting time, budget, and effort into getting everything live. The reality is that nearly 90% of eCommerce businesses struggle with Amazon ads at some point, even those with strong products and clear growth goals.
At first, it’s easy to assume the fix lies in tightening the fundamentals - better creatives, competitive pricing, or a “solid” high-level strategy. But more often than not, that’s not where things break.
The real issue is a lack of granularity in metrics and decision-making.
On Amazon, success isn’t driven by broad performance views; it’s driven by understanding what’s happening at the keyword, search term, placement, and ASIN level. Even the best product can fail if your marketing strategy lacks these granular insights.
So how do you expand and refine your Amazon advertising strategy to ensure every dollar you spend is an investment, not a gamble? That’s exactly what this article covers, broken down into three clear parts:
But, firstly to make your Amazon ads working, identifying the root cause is crucial. From there, you can build a strategic, insight-led Amazon PPC campaign. Once traction follows, scaling becomes a controlled, repeatable process - not a leap of faith.
Let’s dive right in!
Before you launch or scale any Amazon ad campaign, it’s critical to understand the three core ad formats and the role each one plays in your growth strategy.
In this phase, the goal is to build a clean, structured Amazon Ads account that clearly shows how shoppers discover, evaluate, and purchase your products.
Without this foundation, scaling later becomes guesswork.
In the early stages, your ad budget is a research tool, not a profit lever. Many brands fail here because they expect efficient returns before Amazon’s algorithm and their own team has enough data to learn from.
You should allocate a dedicated test budget that you’re comfortable investing purely for insights. During this phase, higher ACOS and TACOS are expected and acceptable. These metrics will normalize only after you identify eCommerce high-intent keywords and winning search patterns.
Actions to take:
Your first campaign should always be a Sponsored Products (SP) Auto-Targeting campaign. Auto campaigns allow Amazon to match your product to real customer searches, uncovering terms you would never think to target manually.
This campaign must be allowed to run long enough to reach statistical relevance. Cutting it early because of poor efficiency defeats its purpose. What you’re buying here is visibility into how Amazon understands your product and how customers actually search.
Actions to take:
Once enough data is collected, you now need to get the Search Term Report. It shows exactly which customer searches triggered your ads and which of those searches resulted in clicks and sales.
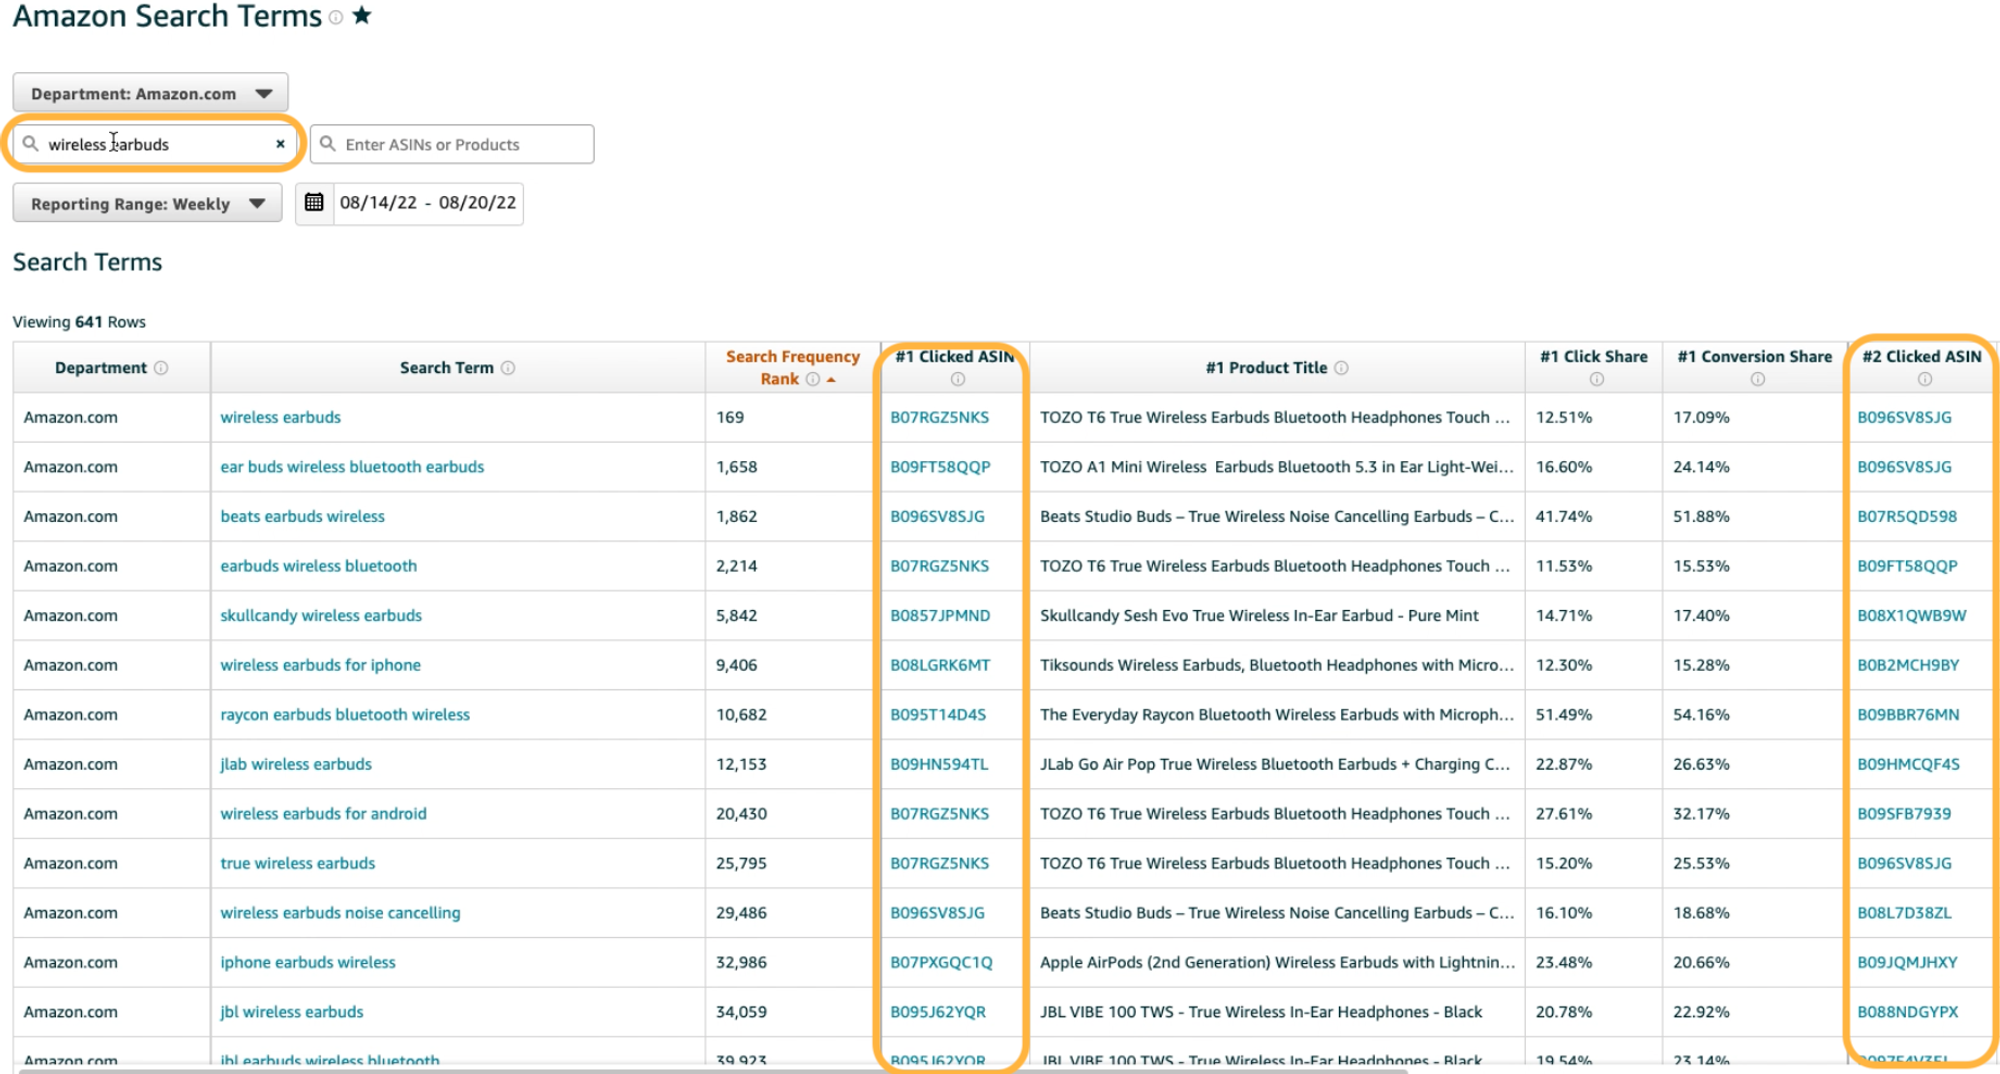
The focus here is on identifying high-intent, conversion-driven terms, not vanity traffic. These insights will directly inform your manual keyword campaigns in the next phase.
Actions to take:
Once you’ve harvested high-intent search terms, the next step is control. Manual Sponsored Product (SP) campaigns allow you to decide how aggressively to bid, where to show, and how to evaluate performance by intent type. Segmentation prevents data dilution and makes optimization measurable.
Create five separate manual SP campaigns:
Each campaign type behaves differently, which is why separation is critical.
Actions to take:
As you add manual campaigns, failing to control overlap will cause internal competition and wasted spend. This is where disciplined negation protects efficiency.
Return to your original SP | Auto campaign and negate every keyword you’ve moved into manual targeting. This forces Amazon to stop spending on terms you now actively manage.
The auto campaign’s role becomes singular: discover new search behavior, not scale known winners.
Actions to take:
A standardized naming convention isn’t cosmetic - it’s operational leverage. As your account grows, clear nomenclature allows faster audits, cleaner reporting, and safer scaling decisions.
When every campaign name instantly communicates ad type, targeting method, and intent, optimization becomes systematic instead of manual guesswork.
Actions to take:
With your campaign foundation in place, Phase 2 is where performance is shaped and scaled. The focus now shifts to a continuous, data-driven optimization loop that should be executed every 10–15 days.
This cadence ensures you react quickly to performance signals without over-optimizing or disrupting learning. The objective is to systematically reduce wasted spend, improve efficiency, and expand on what’s already converting.
Every optimization cycle begins with pulling the right reports. Two reports are essential for informed decision-making:

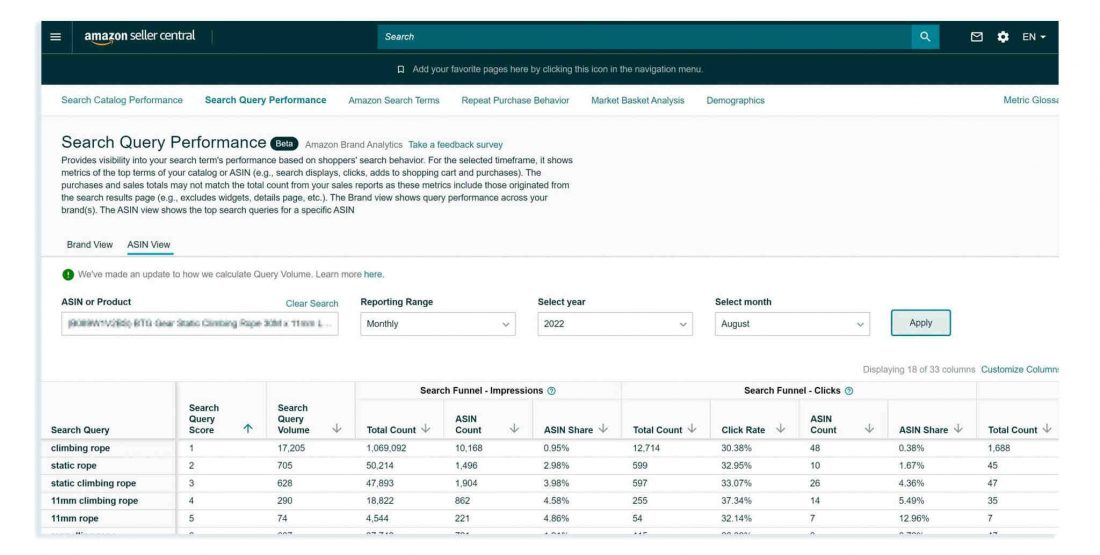
Together, these reports answer two critical questions: Where is money being wasted? And where is growth being capped?
Actions to take:
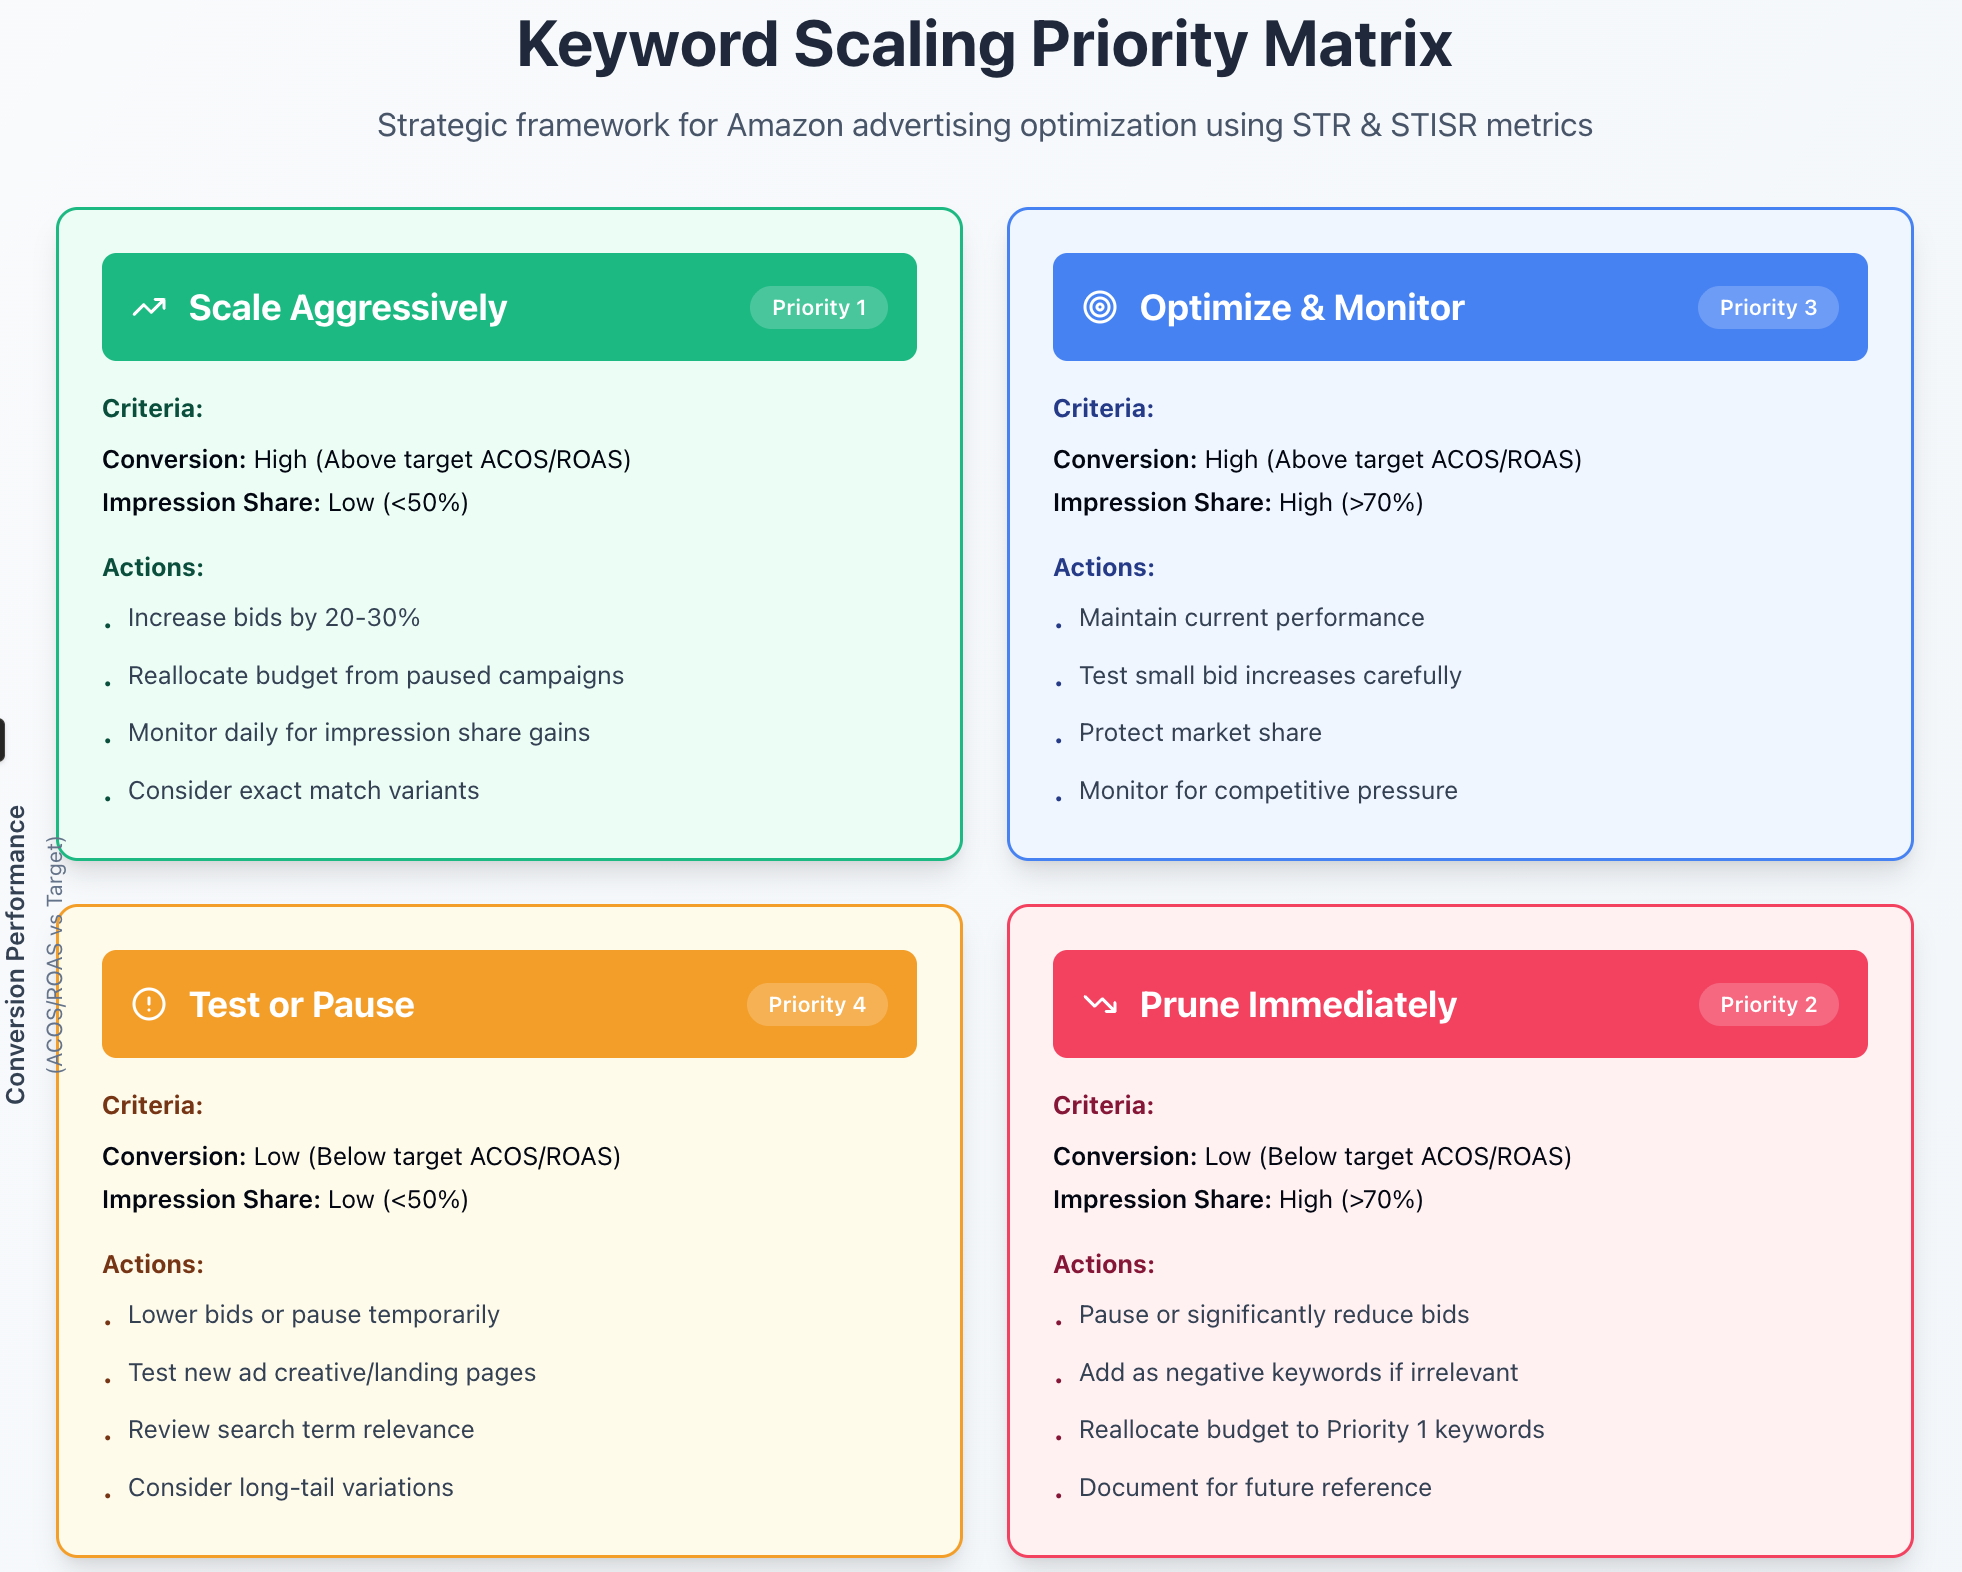
Once the data is in place, the first priority is eliminating inefficient spend. Using the STR, identify keywords, search terms, or targets with high spend and low or zero conversions. These terms dilute performance and inflate ACOS without contributing to revenue.
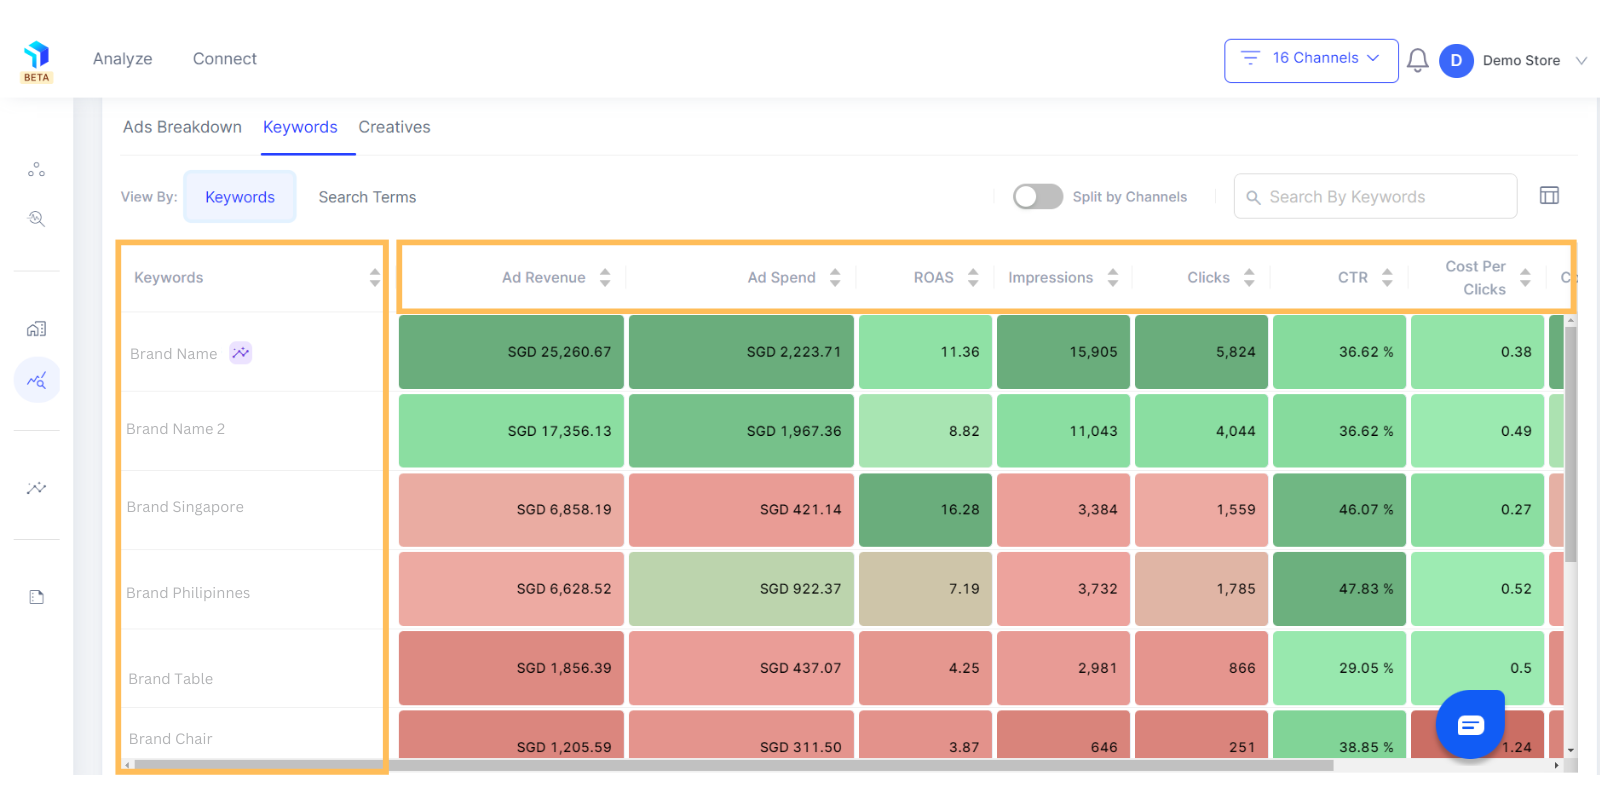
This is where Graas becomes a force multiplier. Graas consolidates data from Amazon Ads along with your other sales and marketing platforms into a single, unified dashboard. Instead of evaluating Amazon performance in isolation, you can clearly see how wasted ad spend impacts overall revenue efficiency and marketing ROI, making optimization decisions faster and more confident.
Actions to take:
After pruning inefficiencies, shift focus to expansion. Using the STR and STISR together, identify high-converting keywords with low impression share. These terms have already proven purchase intent but aren’t receiving enough visibility.
Graas helps uncover these opportunities by correlating conversion performance with traffic share across campaigns. This makes it easy to prioritize scale where demand already exists, rather than guessing where to increase budgets.
Actions to take:
Executed consistently, this optimization routine turns Amazon advertising into a predictable growth engine rather than a reactive spend channel.
Launching Amazon ads is easy. Scaling them profitably is not. As this guide shows, sustainable growth comes from disciplined campaign structure, granular data analysis, and a repeatable optimization process - not guesswork or one-time tweaks.
When every keyword, bid, and budget decision is backed by real performance data, Amazon ads shift from being a cost center to a predictable revenue driver.
Graas makes this possible by bringing your Amazon Ads data together with insights from all your sales and marketing channels into one unified dashboard. This clarity helps you spot inefficiencies faster, scale what’s working with confidence, and ensure every dollar spent is accountable.
If you’re ready to move beyond trial-and-error and launchAmazon ads that scale, book a demo with Graas today and see the difference data-driven Amazon advertising makes.

WhatsApp Chatbots vs AI Sales Agents: Which Drives Higher Conversions for eCommerce Brands?
Read more
How brands use WhatsApp for eCommerce in SEA: The role of AI agents in driving conversions
Read more
From Browsing to Chat: Why Conversations Are Driving eCommerce
Read more
The ROI of Centralizing Marketplace Operations with Execute
Read more
How Enterprise Brands Manage Inventory Across Shopee, Lazada, and TikTok Shop
Read moreEver launched an Amazon ad campaign only to see a small influx of orders and nothing more?
If yes, you’re not alone. We know how frustrating that feels, especially after putting time, budget, and effort into getting everything live. The reality is that nearly 90% of eCommerce businesses struggle with Amazon ads at some point, even those with strong products and clear growth goals.
At first, it’s easy to assume the fix lies in tightening the fundamentals - better creatives, competitive pricing, or a “solid” high-level strategy. But more often than not, that’s not where things break.
The real issue is a lack of granularity in metrics and decision-making.
On Amazon, success isn’t driven by broad performance views; it’s driven by understanding what’s happening at the keyword, search term, placement, and ASIN level. Even the best product can fail if your marketing strategy lacks these granular insights.
So how do you expand and refine your Amazon advertising strategy to ensure every dollar you spend is an investment, not a gamble? That’s exactly what this article covers, broken down into three clear parts:
But, firstly to make your Amazon ads working, identifying the root cause is crucial. From there, you can build a strategic, insight-led Amazon PPC campaign. Once traction follows, scaling becomes a controlled, repeatable process - not a leap of faith.
Let’s dive right in!
Before you launch or scale any Amazon ad campaign, it’s critical to understand the three core ad formats and the role each one plays in your growth strategy.
In this phase, the goal is to build a clean, structured Amazon Ads account that clearly shows how shoppers discover, evaluate, and purchase your products.
Without this foundation, scaling later becomes guesswork.
In the early stages, your ad budget is a research tool, not a profit lever. Many brands fail here because they expect efficient returns before Amazon’s algorithm and their own team has enough data to learn from.
You should allocate a dedicated test budget that you’re comfortable investing purely for insights. During this phase, higher ACOS and TACOS are expected and acceptable. These metrics will normalize only after you identify eCommerce high-intent keywords and winning search patterns.
Actions to take:
Your first campaign should always be a Sponsored Products (SP) Auto-Targeting campaign. Auto campaigns allow Amazon to match your product to real customer searches, uncovering terms you would never think to target manually.
This campaign must be allowed to run long enough to reach statistical relevance. Cutting it early because of poor efficiency defeats its purpose. What you’re buying here is visibility into how Amazon understands your product and how customers actually search.
Actions to take:
Once enough data is collected, you now need to get the Search Term Report. It shows exactly which customer searches triggered your ads and which of those searches resulted in clicks and sales.
The focus here is on identifying high-intent, conversion-driven terms, not vanity traffic. These insights will directly inform your manual keyword campaigns in the next phase.
Actions to take:
Once you’ve harvested high-intent search terms, the next step is control. Manual Sponsored Product (SP) campaigns allow you to decide how aggressively to bid, where to show, and how to evaluate performance by intent type. Segmentation prevents data dilution and makes optimization measurable.
Create five separate manual SP campaigns:
Each campaign type behaves differently, which is why separation is critical.
Actions to take:
As you add manual campaigns, failing to control overlap will cause internal competition and wasted spend. This is where disciplined negation protects efficiency.
Return to your original SP | Auto campaign and negate every keyword you’ve moved into manual targeting. This forces Amazon to stop spending on terms you now actively manage.
The auto campaign’s role becomes singular: discover new search behavior, not scale known winners.
Actions to take:
A standardized naming convention isn’t cosmetic - it’s operational leverage. As your account grows, clear nomenclature allows faster audits, cleaner reporting, and safer scaling decisions.
When every campaign name instantly communicates ad type, targeting method, and intent, optimization becomes systematic instead of manual guesswork.
Actions to take:
With your campaign foundation in place, Phase 2 is where performance is shaped and scaled. The focus now shifts to a continuous, data-driven optimization loop that should be executed every 10–15 days.
This cadence ensures you react quickly to performance signals without over-optimizing or disrupting learning. The objective is to systematically reduce wasted spend, improve efficiency, and expand on what’s already converting.
Every optimization cycle begins with pulling the right reports. Two reports are essential for informed decision-making:
Together, these reports answer two critical questions: Where is money being wasted? And where is growth being capped?
Actions to take:
Once the data is in place, the first priority is eliminating inefficient spend. Using the STR, identify keywords, search terms, or targets with high spend and low or zero conversions. These terms dilute performance and inflate ACOS without contributing to revenue.
This is where Graas becomes a force multiplier. Graas consolidates data from Amazon Ads along with your other sales and marketing platforms into a single, unified dashboard. Instead of evaluating Amazon performance in isolation, you can clearly see how wasted ad spend impacts overall revenue efficiency and marketing ROI, making optimization decisions faster and more confident.
Actions to take:
After pruning inefficiencies, shift focus to expansion. Using the STR and STISR together, identify high-converting keywords with low impression share. These terms have already proven purchase intent but aren’t receiving enough visibility.
Graas helps uncover these opportunities by correlating conversion performance with traffic share across campaigns. This makes it easy to prioritize scale where demand already exists, rather than guessing where to increase budgets.
Actions to take:
Executed consistently, this optimization routine turns Amazon advertising into a predictable growth engine rather than a reactive spend channel.
Launching Amazon ads is easy. Scaling them profitably is not. As this guide shows, sustainable growth comes from disciplined campaign structure, granular data analysis, and a repeatable optimization process - not guesswork or one-time tweaks.
When every keyword, bid, and budget decision is backed by real performance data, Amazon ads shift from being a cost center to a predictable revenue driver.
Graas makes this possible by bringing your Amazon Ads data together with insights from all your sales and marketing channels into one unified dashboard. This clarity helps you spot inefficiencies faster, scale what’s working with confidence, and ensure every dollar spent is accountable.
If you’re ready to move beyond trial-and-error and launchAmazon ads that scale, book a demo with Graas today and see the difference data-driven Amazon advertising makes.
© 2026 Graas AI
Offices: Singapore | India | Indonesia | Malaysia | Philippines | Thailand | Vietnam